Soil Conditions
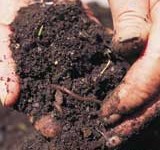
More than anything else, soil condition will have the greatest impact on the long-term health of your lawn. That’s why it’s so important to improve the soil’s grass growing properties while you can—before seeding or sodding. If you have a sandy or heavier clay soil, consider adding some organic matter such as peat moss or compost. [Add 5-20 percent organic matter; for example, 1 inch of organic matter to 5 inches of soil equals 20 percent by volume.] In a sandy soil this helps improve water and nutrient retention; in heavier clay soil it improves drainage and aeration. Use smaller amounts on heavier clay soils and larger amounts on lighter, sandy soils. Thoroughly mixing organic matter into the soil improves and enlarges the root zone area for the grass plants. This is critical for long-term health because an extensive root system occupying larger soil volumes enables grass to better withstand adverse environmental conditions and plant stresses.
It is often tempting to add sand to heavier clay soils hoping to improve their drainage and aeration characteristics but don’t do it! Adding small amounts of sand [an inch or two] usually makes things worse. To effectively modify a heavy clay soil, you’d have to add a tremendous amount of sand [80 to 90 percent by soil volume]. That’s about 8 to 9 inches of sand for every inch of clay soil! At these high rates, sand particles begin contacting each other, thereby opening up larger soil pore spaces. In most situations, adding that amount of sand is not practical. Adding organic matter is a better alternative.
Another way to improve the turf grass root zone is by alleviating soil compaction. This can be done with core cultivators which remove small plugs of soil from the ground and deposit them on the lawn; these are available from many local rental agencies. Several passes in different directions not only put holes into the ground, but also begin the process of root zone improvement. The small soil cores left on the surface will decompose naturally in a few weeks. Severely compacted soils may need two to three treatments per year for the first two to three years. The degree of play and traffic will also determine how often you should core cultivate. By improving the soil’s water infiltration characteristics, core cultivation also reduces runoff.
Soil Testing
 The soil test is an excellent measure of soil fertility. It is a very inexpensive way of maintaining good plant health and maximum crop productivity. The standard soil test provides the status of phosphorous [P], potassium [K], calcium [Ca], magnesium [Mg], pH, cation exchange capacity, lime requirement index, and base saturation. Additional tests are also available for iron [Fe], zinc [Zn], manganese [Mn], soluble salts, and nitrates.
Why Do I Need to Soil Test?
Soil fertility fluctuates throughout the growing season each year. The quantity and availability of mineral nutrients are altered by the addition of fertilizers, manure, compost, mulch, and lime or sulfur, in addition to leaching. Furthermore, a large quantity of mineral nutrients are removed from soils as a result of plant growth and development, and the harvesting of crops. The soil test will determine the current fertility status. It also provides the necessary information needed to maintain the optimum fertility year after year.
Some plants grow well over a wide range of soil pH, while others grow best within a narrow range of pH. Most turf grasses, flowers, ornamental shrubs, vegetables, and fruits grow best in slightly acid soils which represent a pH of 6.1 to 6.9. Plants such as rhododendron, azalea, pieris, mountain laurel, and blueberries require a more acidic soil to grow well. A soil test is the only precise way to determine whether the soil is acidic, neutral, or alkaline.
Most soil nutrients are readily available when soil pH is at 6.5. When pH rises above this value, nutrient elements such as phosphorus, iron, manganese, copper, and zinc will become less available. When soil pH drops below 6.5, manganese can reach a toxicity level for some sensitive plants.
The soil test takes the guesswork out of fertilization and is extremely cost effective. It not only eliminates the waste of money spent on unnecessary fertilizers, but also eliminates over-usage of fertilizers, hence helping to protect the environment.
When Do I Soil Test?
Soil samples can be taken in the spring or fall for established sites. For new sites, soil samples can be taken anytime when the soil is workable. Most people conduct their soil tests in the spring. However, fall is a preferred time to take soil tests if one wants to avoid the spring rush and suspects a soil pH problem. Fall soil testing will allow you ample time to apply lime to raise the soil pH. Sulfur should be applied in the spring if the soil pH needs to be lowered.
How Frequently Should I Soil Test?
A soil test every two to three years is usually adequate. Sample more frequently if you desire a closer monitoring of the fertility levels, or if you grow plants that are known to be heavy feeders.
What Soil Sampling Tools Do I Need?
A soil sample is best taken with a soil probe or an auger. Soils should be collected in a clean plastic pail or box. These tools help ensure an equal amount of soil to a definite depth at the sampling site. However, a spade, knife, or trowel can also be used to take thin slices or sections of soil.
How Do I Take Soil Samples?
1. Remove the top debris, residue, or turf thatch from the soil surface before taking the sample.
2. Sample gardens, trees, shrubs, flower beds, and orchards 6-8 inches deep.
3. For the lawn, lift the sod and sample 3 inches deep.
4. Sample a row crop field or garden between rows to avoid fertilizer bands.
5. Sample when soils are suitable for spading or plowing.
6. Take separate samples from fields that have received different fertility programs.
7. Take separate samples from soils that are distinguishable by color [i.e. light vs. dark], drainage, or other factors.
The test results are only as good as the sample taken. It is extremely important to provide a representative sample to the testing lab so that a reliable test and recommendations can be made for the entire area. This can be accomplished by submitting a composite sample. A good representative composite sample should contain 10-15 cores or slices. Each core or slice should be taken at the same depth and volume at each site. Sample at random in a zigzag pattern over the area and mix the sample together in a clean plastic bucket.
More samples need to be taken if the area was recently limed or fertilized. Separate samples need to be taken from lawns, gardens, flower beds, or shrub borders. Separate samples should be taken from areas with distinctive soil types or plant performances.
How to Prepare Soil Samples for Submission
1. Contact a soil testing lab for instructions, soil test kits, and appropriate forms.
2. Break up lumps and air dry the soil at room temperature with no artificial heat.
3. When the soil is dry, mix well and crush soil lumps to the size of wheat grains or smaller.
4. Take about one pint of the composite sample and place it in the sample bag associated with the kit.
Where Do I Send My Soil Sample?
You need to mail soil sample[s], completed sample form[s], and appropriate payment to the soil testing lab you selected. Generally, soil testing labs will provide a complete set of instructions, either with sample kits or upon request. Follow the instructions carefully.
How Long Does the Soil Test Take?
Soil test results and fertilizer recommendations are usually mailed in two weeks, depending on the labs you work with. Make sure you fill out the form for the types of plants you grow or will be growing. Otherwise, no recommendations will be given. Indicate whether the crop is planted, or is to be planted. Incomplete forms may cause delays in receiving results and recommendations.
* $125 per yard equivalent to 25 / 40 lbs bags
** Soil Test-$45.00. Highly recommended to assure proper dosage of applications and treatments.